Saturday, February 13, 2021

The Worst Strategy of World War II

A Dangerous Strategy Used By Both Sides During WWII

German POWs at Stalingrad worldwartwo.filminspector.com
German POWs at Stalingrad, awaiting their fate.
There is a lot written about the biggest mistakes of World War II. Variously, some people put Adolf Hitler's decision to invade the Soviet Union or his declaration of war against the United States at the top of the list. And, those are good choices that combine the political and the military, but they were more decisions than strategy. Below these grand strategic questions, however, is another layer that combines elements of strategy and tactics and occurs much more often. This article is going to look at the worst military strategy of World War II that was practiced by both sides and had a low probability of success: the decision to "hold fast" in the face of overwhelming enemy power.
German POWs at Stalingrad worldwartwo.filminspector.com
Field Marshal Paulus and General Schmidt leaving camp to surrender at Stalingrad.

The Most Common Mistake

Easily the most common military strategy that has a huge likelihood of failure is to refuse to withdraw in the face of overpowering enemy strength. Forces that still have time to get away are told to "hold fast" and "wait for relief" when the odds of rescue are slim. It’s amazing how this happens over and over. While everyone pins the Reich’s defeat in part on Hitler’s repeated “stand fast” orders, in fact, it was a common tactic on both sides.
German POWs at Stalingrad worldwartwo.filminspector.com
German POWs being marched east from Stalingrad.

The Axis Ordered Many "Last Stands"

Hitler’s most famous use of this “stand fast” tactic, at Stalingrad, became his most notorious defeat. "We shall hack you free!" he told the trapped men. Well, that didn't happen.

However, just months before, the strategy had succeeded for Hitler at Demyansk and Kholm. In fact, it's arguable that the "stand fast" orders saved the entire Wehrmacht during the Soviet counteroffensive in front of Moscow in December 1941. "Holding fast" as a strategy doesn't always fail, it just has a low probability of success. 

It was only after the tides of war completely turned against Germany that refusing to authorize retreats became the common currency of the Wehrmacht's strategy. It became so routine that ordinary towns were routinely categorized as "fortresses" simply because that was where some unfortunate unit was to be told to make a last stand. The more this strategy was used, the less it worked, but even in 1945, the strategy did occasionally succeed (some German holdouts were even rescued during the failed Stargard counteroffensive, for instance). So, aside from accomplishing a more nihilistic goal of forcing the Allies to “bleed themselves white” reoccupying ground, the strategy did work just often enough to not be an absolute death sentence for the troops involved.
German troops at Monte Cassino worldwartwo.filminspector.com
The German defenders of Monte Cassino gave the Allies fits because they dug in and fought as part of a larger defensive line - and ultimately managed to get away to fight again.
Perhaps the most common justification for this tactic is "well, you have to hold somewhere." That's absolutely true. However, where you make a stand is as important as the fact that you make a stand. For instance, the right way to make a stand is as part of a defensive line. While the German parachute troops (Fallschirmjaeger) at Monte Cassino held an exposed position, they did so as part of a larger defensive line that ran across the Italian peninsula. They could not be surrounded and had sources of supply and thus held out throughout the winter of 1943-1944. Just as in Sicily nine months earlier, the paratroopers finally withdrew and lived to fight another day, making the Italian campaign a nightmare for the Allies.

So, while isolated on a mountain and undergoing grueling attacks, the German paratroopers accomplished something worthwhile for the German war effort before falling back in good order. This was at least as much as they could have accomplished if they were in some town surrounded by the enemy and told to fight to the last man. Operating as part of a cohesive defensive strategy is much different than being told to stay put in an exposed position where you could be attacked from all sides and given the cold comfort of an empty promise that "we'll save you - when we get the chance." You need to preserve your precious human assets during a long war, not just throw them away in some obviously futile gesture.
An explosion on Iwo Jima worldwartwo.filminspector.com
The Japanese defenders of Iwo Jima were told to fight and die there, and that is what they did - virtually to the last man. What did that accomplish? Not much, because it was not part of a consistent defensive effort.
The Japanese were notorious for garrisoning islands like Iwo Jima and then basically wiping their hands of them. The strategy was for these island garrisons to fight to the last man and then succumb either at the enemies' hands or their own. Fighting to the death for worthless islands, the thinking went, would make the Allies' progress across the vast Pacific so costly that it ultimately would fail or at least slow it down interminably. While the US did invade Iwo Jima in Operation Detachment, it did not slow them down. The US Navy successfully undermined this strategy with its "island-hopping" strategy, a form of encirclement.
Japanese troops invade the Aleutian Islands worldwartwo.filminspector.com
In a smart strategic move, the Japanese evacuated their forces in the Aleutians literally days before the Allies planned to invade.
To the credit of the Japanese, they had two of the most effective withdrawals from hopeless positions of the war. These were at Guadalcanal in early February 1943 and the Aleutians that August. The Aleutians evacuation was so effective that the Allies actually invaded the Japanese-held islands only to find they had already left. It’s hard to imagine what point there would have been for the Japanese to leave the troops there to fight to the last man as usual. The Japanese undoubtedly made the right decisions and the troops were able to fight somewhere else. These two brilliant withdrawals proved the point that timely retreats from exposed positions are worthwhile strategies and certainly better than just leaving the troops there to die or be captured.
Defenders of Bastogne worldwartwo.filminspector.com
The US defense of the crossroads at Bastogne turned into a stirring victory that just as easily could have become a disaster.

The Allies "Held Fast" to Their Detriment, Too

Usually, any analysis of this "hold fast" doctrine ends there. The implication is that the Axis used this strategy out of desperation and that is why they lost. You read all the time about "Hitler's insane hold-fast orders." You'd think that only the Germans and Japanese believed in ordering their men to stay in virtually hopeless positions.

But, that's not the case. Less publicized are instances when the Allies used this “stand fast” strategy. When Hitler did it, well, it was just because he was a crazed maniac, but when the Allies did it, circumstances just turned out wrong. Right? At least, that’s how the history books would have it. So, having made that bold statement, let’s give a couple of examples.
Bataan Death March of April 1942 worldwartwo.filminspector.com
US POWs during the Bataan Death March of April 1942.
As our first example, the United States left 100,000 men in Bataan in April 1942 when there were clear signs that they had no hope of winning. The Japanese power centers were closer, they had growing control of the sea around the Philippines, and the US was virtually powerless to reinforce General Douglas MacArthur’s troops. Japanese strength was increasing and the Allied strength was decreasing at a consistent rate throughout the confrontation.

A weird sense of complacency settled over the US high command as they relied on shaky Filipino allies to hold major portions of the Main Defense Line across the neck of the Bataan peninsula. It can be argued that the US couldn’t evacuate for this or that reason, but the attempt was never even made during the four months available and the supply clerks there were still ordering mundane supplies as the threat grew. This all led to the infamous Bataan Death March. You never see the US strategy described as a failed Hitler-like “stand fast” strategy even though that is exactly what it was. It’s hard to see any positive effect on overall US strategy from the way the Bataan battle was conducted, and it badly damaged the Allied morale.
Defense of St. Vith worldwartwo.filminspector.com
US troops dug in at St. Vith, which the Germans eventually took at great cost to both sides (US Army).
The US Army had varied success with this “stand fast” strategy, just like all the other major powers. Everyone remembers the successful valiant stand made at Bastogne. Nobody, however, really likes to talk about the failed attempt to hold nearby St. Vith. The Americans by then, fortunately for them, had learned their lessons and ordered a fairly successful withdrawal from St. Vith at the last minute and standing there did have some marginal positive effects for the Allies. However, the Germans also did acquire a lot of badly needed supplies there when they finally occupied the town. When you attempt to hold an exposed position against overwhelming force, you are simply gambling when there really is no need to gamble at all.
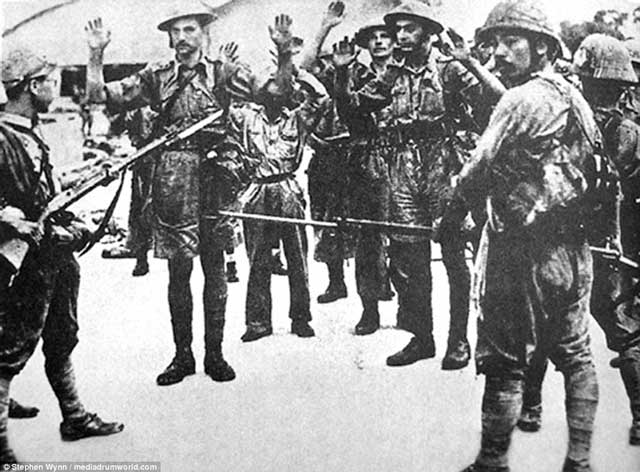
British surrender at Singapore 15 February 1942 worldwartwo.filminspector.com
British General Percival (not shown) was forced to surrender at Singapore on 15 February 1942 due to a failed “hold fast” strategy. Some consider this the most humiliating defeat in British military history.
Second, let’s talk about the fall of Singapore. The British were not immune to this “stand fast” tendency, either. The British troops in the Malayan peninsula had absolutely no success holding the Japanese anywhere as they retreated - at times running - back toward Singapore. Still, the British both in Singapore and London acted as if nothing was wrong virtually until the white flag of surrender was raised on 15 February 1942. In fact, the British were sending troops into Singapore in the final days, not taking them out. Some Commonwealth soldiers remembered walking off the transports almost directly into the POW camps. Yes, the argument can be made that there was no hope of withdrawal, but no serious attempt was made while there was still time to do so (and they had two full months), so we’ll never know. Once again, all sorts of excuses are made about how “nobody foresaw” the defeat and so forth, but that’s a job for the military - to understand the real situation and act prudently. Nobody foresaw it because they didn’t want to even though there were tell-tale signs all along.
Soviet POWs at Kiev worldwartwo.filminspector.com
Soviet prisoners under guard after the defeat at Kiev (Scherl/Global Look Press).
Third, how about the Soviet Union? Soviet troops stood fast throughout Operation Barbarossa and the Germans simply drove around to encircle them. This famously happened, for instance, at Kiev (Kyiv), but also in many lesser-known battles such as Vyazma and Bryansk. One can ascribe these encirclements to swift German advances and overall superiority, but really they were the result of Soviet (primarily Stalin’s) refusal to accept reality and withdraw. Germans were astonished at Kharkiv in May 1942 when the Soviets didn’t even try to rescue their trapped comrades in a huge pocket there. Stalin just wrote off hundreds of thousands of troops because he did not want to acknowledge defeat.

The argument that these encirclements “slowed the Germans down” is easy to make, but sacrificing literally hundreds of thousands of troops in each battle really isn’t a very efficient strategy. It was only after the Soviets accepted reality in mid-1942 and made some withdrawals in a timely fashion (something Stalin didn’t exactly like) that things began to turn around for them.
British POWs at Arnhem in September 1944 worldwartwo.filminspector.com
British prisoners at Arnhem in September 1944. "Hold until relieved" they were ordered.

Conclusion

You may think that the utter failure throughout the war of "hold fast" orders caused military strategists to reject this strategy in the post-war years. In fact, just the opposite happened. In the 1970s, NATO developed a "hedgehog" strategy wherein it was assumed that Warsaw Pact forces would sweep across Western Europe and brush aside all attempts at defensive lines. The working strategy was that the battered NATO troops would hold out in cities ("hedgehogs"), which for some reason were considered more defensible than other areas. This was just a prettified version of the Wehrmacht's "fortress" strategy that failed spectacularly on the Eastern Front. However, in a sense, the German strategy was affirmed as NATO concluded that it was the best available recourse for a greatly outmatched defender. In that situation, however, it was assumed that the US would just need a little time to come in full bore and rescue everyone.

So, the most common failed military strategy is the decision not to order a withdrawal in a timely fashion, to believe that “holding out” has some magical property all its own. This strategy is so common that I can virtually guarantee you that it will happen again in future wars. Nobody wants to accept defeat or weakness, and that goes double for military commanders. Once in a while, the strategy does succeed - the Australians holding Port Moresby, for instance, or the Germans at Demyansk - but much more often, the strategy is doomed to failure. It usually only leads to more opportunities further back to “hold out” in the mistaken belief that this will hurt the enemy more than your own side. But, in essence, it is just a reflection of a common human inability to accept one's own limitations.

2021

Sunday, February 7, 2021

How Much Did the Royal Navy Contribute to Victory in the Pacific?

In Search of Political Glory

Seafires of 887 Sqn. on HMS Indefatigable in November 1945 worldwartwo.filminspector.com
Seafire IIIs of RAF Nos. 887 and 894 Squadron aboard HMS Indefatigable en route from Australia to New Zealand in November 1945.
An enduring question about World War II is how much did the Royal Navy contribute to the defeat of Japan. Let's take a closer look and see what the Royal Navy did, and why.

United States control of the Pacific Theater of Operations (PTO) during World War II was a product of simple reality. The US Joint Chiefs of Staff acquired complete control of the PTO on 24 March 1942. This was part of a “grand bargain” made between President Roosevelt, who asked explicitly in a 9 March 1942 cable for US control of the PTO, and Prime Minister Winston Churchill. Roosevelt argued then that it was time to replace the "complexity" of the "obsolescent" command arrangements in the Pacific and give the United States military sole authority there, as the US already was planning "offensives in a northwesterly direction."

This "complexity" Roosevelt referred to apparently meant nominal British political control over Australia and New Zealand while the United States now conclusively had established military control. The political chain of command interfered with the de facto military one. In effect, Roosevelt asked for US military hegemony in the Pacific. Churchill, still reeling from the loss of Singapore, quickly agreed.
The fall of Singapore during World War II worldwartwo.filminspector.com
The fall of Singapore on 15 February 1942 was the major turning point in Royal Navy ambitions in the Pacific. It would not return in force until 1945.

After Early Losses, the British largely Abandon the Pacific

Singapore was the cornerstone of British strength in the Pacific. Its loss in February 1942 ended the longstanding British power east of India for some time. The British Admiralty realized the dangers of reinforcing the Indian Ocean, much less the Pacific, following the loss of battleship Prince of Wales and cruiser Repulse off the Malayan Peninsula in December 1941. The Royal Navy was hard-pressed just protecting the North Atlantic convoys and maintaining a credible defensive presence in the British Isles themselves. Many Royal Navy warships were being repaired in US shipyards throughout 1942 and 1943 and the Admiralty did not have the ships to spare for presumably profitless expeditions to the Pacific. The Australians basically accepted their abandonment by the British when they accepted US General Douglas MacArthur as the supreme commander in the Southwest Pacific Theater of Operations on 17 March 1942

The successful Japanese Indian Ocean Raid of early April 1942 that threatened British control of India was another eye-opener. Royal Navy weakness in the region became obvious when it was forced to move its Asian command (at that time basically just covering the Indian Ocean) all the way back to Kilindini, Kenya, the old East Africa Station, on 11 April 1942. There it remained under the command of Flag Officer, East Africa, Rear-Admiral A.D. Read and his successors until the Japanese threat to Ceylon (Sri Lanka) was considered ended. This showed that the British had their hands full just defending their bastion of strength in the Indian Ocean, much less operating in strength in the Pacific.
HMS Victorious in 1943 while serving with the US Navy worldwartwo.filminspector.com
HMS Victorious in 1943, during its service in the Pacific with the US Navy. Note the light square painted on its flight deck toward the left. This was a decoy intended to appear to be a vulnerable elevator to Japanese pilots. The intent was to draw their aim to the strongest part of the armored flight deck.

The Royal Navy Helps Out On Occasion

The US Navy was hard-pressed in the PTO throughout 1942 and 1943. US Chief of Naval Operations Admiral Ernest J. King always placed naval operations there as a priority and often requested Royal Navy assistance during this period (the first request, denied, was made immediately after the Battle of Midway in June 1942). The British, though, were loathe to dispatch ships from what they considered the all-important European Theater of Operations (ETO). Thus, the US Navy was left to carry the main burden in the PTO.

The Royal Navy did help out when it had the ships to spare and assistance could prove useful. After a refit at the Norfolk, Virginia, naval yard, the carrier HMS Victorious (R 38), for instance, sailed to the Pacific through the Panama Canal on 14 February 1943. Victorious was given the radio call-sign “Robin” as a security/ deception measure, though it never actually became the USS Robin and flew the British flag. 
HMS Victorious in 1942 worldwartwo.filminspector.com
HMS Victorious flight direction room sometime during 1942. This was a strength of all Royal Navy carriers.
Victorious served as part of the US Navy Third Fleet during much of the rest of 1943 as part of Carrier Division One. This was during a period when the US Navy was short of flight decks due to the loss of USS Hornet and damage to Enterprise in the Santa Cruz islands campaign. As part of Task Force 14 (later Task Group 36.3), Victorious covered the invasion of New Georgia during Operation Cartwheel and spent a record (for the Royal Navy) 28 consecutive days in combat operations at sea. Victorious was recalled in July when the first two new US Essex-class carriers arrived at Pearl Harbor ahead of schedule, ending the temporary US shortage of available flat tops. 

There was no unanimity on either side about the use of Royal Navy forces in the PTO during 1942-1944. Admiral Sir Percy Noble, head of the British Admiralty Delegation in Washington, advocated strongly for an increased Royal Navy presence in the PTO as early as January 1944. He had no influence. There was no political will for transferring forces to the PTO as long as the German Kriegsmarine remained a credible threat. So, everyone waited for major developments in the North Atlantic, which were a long time in coming.
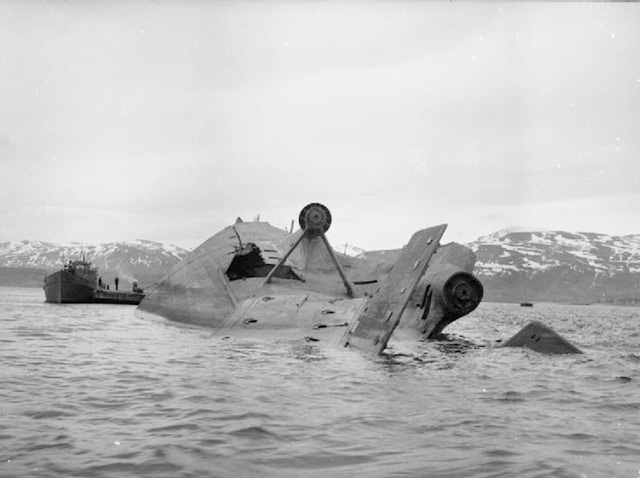
Tirpitz sunk in November 1944 worldwartwo.filminspector.com
The sinking of the German battleship Tirpitz in November 1944 finally freed up Royal Navy forces for the Pacific.

Sinking the Tirpitz Finally Frees Up Royal Navy Forces

British preoccupation with protecting the home islands remained the reality until the sinking of the German battleship Tirpitz on 12 November 1944 after ceaseless British attacks on it throughout the war years. This was the turning point regarding a Royal Navy presence in the Pacific. The Admiralty finally concluded at that time that the world naval situation had changed, the British Isles were no longer in jeopardy, and it was time to begin transferring units to the Pacific Theater. In my estimation, this decision was political as much as a military one, as the Churchill government would have fallen if the Tirpitz somehow, against all the odds, turned up off the coast of England and began shelling British civilians.

The British Pacific Fleet (BPF) was inaugurated soon thereafter on 22 November 1944 (before that, the few Royal Navy ships in the theater were in the old prewar “Eastern Fleet”). It is important to emphasize that it was a British decision to keep all of the large Royal Navy forces in the Atlantic and leave the PTO to the Americans, this was not a decision that was imposed upon them. The British would have simply abandoned the PTO without the large US presence there.
HMS Implacable worldwartwo.filminspector.com
The crew of HMS Implacable of the BPF stowing an Avenger into the upper hangar in 1945 (Australian War Memorial No. 019034).
It’s easy to think now that changes in things like naval fleets happen immediately or quickly. That was not the case during World War II (nor is it now, for that matter). The BPF took time to set up and its main base was at Sydney, with a forward base at Manus Island. This was considered quite adventurous, as more cautious minds in the Admiralty would have placed fleet headquarters all the way back in India.

There was an immediate misunderstanding with the Australian government over funding for the BPF and related issues. These may seem like pesky details, but they take time to sort out, especially while there’s a war on and leaders have other major decisions to make. Ultimately, the Royal Navy fleet did not even arrive in the PTO until 4 February 1945, and it was not at what would consider “full strength” until June. The US Navy was completely accommodating to the Royal Navy’s new presence in the theater and gave the BPF combat units the name Task Force 57 (TF-57) when they joined Admiral Raymond Spruance's United States Fifth Fleet on 15 March 1945.
HMS Formidable on fire in May 1945 worldwartwo.filminspector.com
HMS Formidable (as seen from Victorious) on fire after a Kamikaze hit off Sakishima Gunto on 4 May 1945. There were eight dead and 47 wounded, with eleven Allied aircraft destroyed (© IWM A 29717).

The Royal Navy on the Attack in the Pacific

There was some reluctance on both sides over the commitment of major Royal Navy assets in the PTO even after the sinking of the Tirpitz. To sum up the general feeling, the British were torn between sacrificing even more men in a war they considered basically won and upholding their national honor by helping to beat Japan. The Americans, on the other hand, were suspicious of the Royal Navy's ability to help in the PTO and also a bit skeptical of British motivations in trying to horn in on claiming partial credit for the US Navy success there.

Admiral Ernest King worldwartwo.filminspector.com
US Admiral Ernest J. King didn't get Royal Navy help when he wanted it but did when he no longer needed it.
US Fleet Admiral (as of 19 December 1944) Chester Nimitz, for instance, questioned the ability of Royal Navy ships that had been designed for the relatively confined sphere of operations in the ETO to operate on long-range missions in the PTO. Royal Navy Rear Admiral Philip Vian (in his memoir "Action This Day") recalled:
Meanwhile, Admiral [Bruce] Fraser, appreciating fully the great importance, from a national point of view, of the Royal Navy engaging in the most modern type of sea warfare in company with the Americans who had perfected it, had been striving to convince Admiral Nimitz that the British would not only be able to operate alongside the Americans without calling on them for logistic aid, but that their Fleet would be of real help in the task which lay ahead – defeating Japan. He found that, like Admiral King, Admiral Nimitz felt that the fast United States carrier striking forces were perfectly capable of dealing, on their own, with the operations contemplated for the final reduction of the enemy…
Admiral King agreed with some British admirals that the Royal Navy was best occupied in the Indian Ocean attacking Japanese supply lines there. This hopefully, from his point of view, would provide a diversionary function and draw off some Japanese forces from the main axes of attack in the Pacific. This would make the conquest of Japan easier. It also would be less dangerous and offer less glory to the Royal Navy - or, more accurately again from King's perspective - was desirable because it would reserve all the glory for the US Navy.

Some read into King's position a degree of resentment over British refusals to help out earlier in the war. Vian himself, however, accepted that Admiral King's position was not rooted in anglophobia but instead what King considered best for the US Navy. There were varying degrees of national pride and resentment over unfair load-sharing during the war on both sides, of course, and justifications aplenty for every position depending on how minutely or globally one examined the issue.

Just to flesh it out a bit, the British rightfully (in their eyes) resented having to carry the full military load against Hitler for over two long years and deserved a share of any glory for that reason alone, while the Americans rightfully (in their eyes) felt they had won the war in the Pacific basically by themselves and deserved all of the credit there. Neither position was 100% accurate but each did carry a grain of truth. The British also wanted to be on the scene to legitimize and protect their post-war interests in colonies in Singapore, Hong Kong, and elsewhere. There no doubt were other petty resentments and grudges on both sides.

Apparently, King did more or less try to block the use of the BPF but was overruled by Roosevelt at Churchill's insistence. Due to Japan's weakness, this was a political matter more than a military one by this late point of the war.
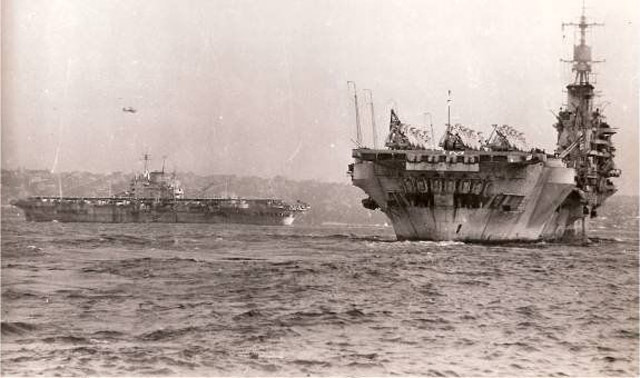
Aircraft carriers of the British Pacific Fleet during World War II worldwartwo.filminspector.com
In a politically motivated display of Royal Navy power, HMS Formidable leads the British Pacific Fleet into Sydney Harbor on 24 August 1945 after three months of operations off the coast of Japan.
Churchill, who was the final arbiter of all major British strategic decisions during the war, himself revealed the real reason for a Royal Navy commitment to the PTO during its final days. In an address to Parliament on 28 September 1944, Churchill said:
The new phase of the war against Japan will command all our resources from the moment the German War is ended. We owe it to Australia and New Zealand to help them remove forever the Japanese menace to their homelands, and as they have helped us on every front in the fight against Germany we will not be behindhand in giving them effective aid.
In other words, the main impetus behind the Royal Navy's entry into the PTO was purely political. The British wanted to share in the victory over Japan one way or another. Ultimately, it became a matter of British national prestige (as Vian hints at in the selected passage above). The Royal Navy was committed to the PTO in strategic operations, not a mere ancillary role.

The BPF participated in attacks on Japanese forces throughout 1945. Naturally, the US Navy by that point had its equipment built up with landing craft and all the supply chains necessary for invasions, so the Royal Navy wasn’t about to start invading islands and planning its own campaigns and so forth. On the flip side, however, the armored flight decks of the Royal Navy carriers proved more impervious to Japanese Kamikaze attacks, though the attacks did cause long-term problems. The Royal Navy usually played a complementary role to the ongoing strike operations of the US Navy as that was its best way to contribute.
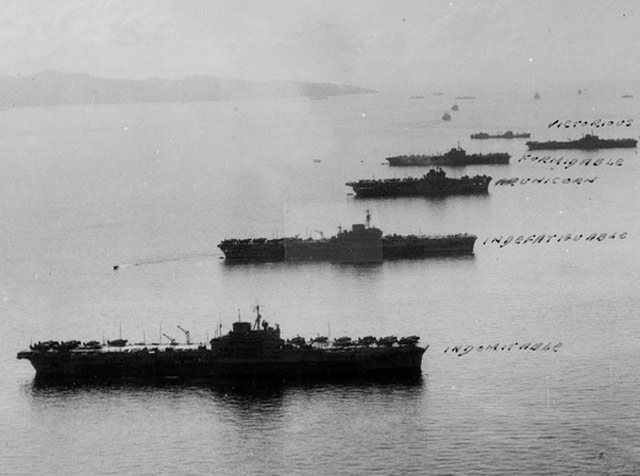
Aircraft carriers of the British Pacific Fleet during World War II worldwartwo.filminspector.com
The pride of the British Pacific Fleet at anchor, as it spent much of its time during its brief tenure during World War II.
The Royal Navy could have played a much more prominent role in the PTO if the war had lasted longer. By August 1945, the BPF (which included ships of Australia and New Zealand, but all the capital ships were British) had six fleet carriers available:
  • Formidable: approximate air group of 36 Corsairs, 15 Avengers (Flagship 1st Aircraft Carrier Squadron)
  • Illustrious: air group 36 Corsairs, 15 Avengers
  • Implacable: 48 Seafire, 21 Avenger, 12 Firefly
  • Indefatigable: 40 Seafire, 18 Avenger, 12 Firefly
  • Indomitable: 39 Hellcats, 21 Avengers
  • Victorious: 36 Corsairs, 15 Avengers, plus Walrus amphibian
In addition, the BPF had thirteen light/ferry/replenishment carriers, four battleships (Howe, King George V, Duke of York, and Anson), a dozen cruisers, forty destroyers, and numerous supporting ships. This was by some measures the strongest fleet ever committed to action in the entire history of the Royal Navy. Unfortunately for British prestige, though, it had little to do because of quickly declining Japanese military fortunes. Task Force 57 was slated to play a major role in Operation Downfall, the contemplated invasion of the Japanese home islands that never took place. Due to its missed chance at political glory, the BPF is sometimes called the "Forgotten Fleet."
Corsair fighter landing on an armored Royal Navy carrier during World War II worldwartwo.filminspector.com
"On board a British Pacific fleet carrier operating against the Japanese. Lieutenant Commander (A) Freddy Charlton, British Fleet Air Arm pilot, had a remarkable escape when the long-range petrol tank of his Chance-Vought Corsair fighter burst into flames (seen here) as he landed on the deck of the aircraft carrier. Both pilot and plane escaped damage." © IWM A 29720
The last naval air action of World War II occurred on VJ-Day when British carrier aircraft shot down Japanese Zero fighters. The US Navy had absolutely no issue with the Royal Navy carrying its share of the load once it was in a position to do so. The Royal Navy should be proud of its participation in the PTO and the US Navy should be proud that it was able to establish control of the area until the Royal Navy was in a position to help out.


2021

Saturday, February 6, 2021

Superweapons of the Reich Coloring Pages

Wonder Weapons of the Third Reich

V-2 wonder weapons worldwartwo.filminspector.com
A V-2 vengeance weapon in flight.
This page is devoted to coloring pages of German superweapons of World War II. While insufficient to win the war for Germany, the superweapons were extremely important in maintaining morale within the Third Reich even as growing Allied military superiority became an inescapable fact.

It is common for people now to conclude that the superweapons were a waste of time and money. However, that ignores the fact that they gave the German government a beacon of hope that kept soldiers fighting and civilians producing weapons of war. That may have been counterproductive for the German state in the long run, but in the short run, it served as very effective propaganda that worked right up until the end of the war.
RAF Gloster Meteor worldwartwo.filminspector.com
The RAF Gloster Meteor jet, an advanced Allied plane that flew and was used defensively against Luftwaffe V-1 flying missiles.
Make no mistake, the Allies had cutting-edge weapons of their own such as the atomic bomb that helped them to win the war. They also had jet planes in various stages of development and so forth. With their country being overrun, though, the Germans were desperate and flung as many of these advanced weapons into service as they could while the Allies had the luxury of relying on their conventional weapons that, after all, were winning the war for them.

Let's look at some of these "wonder weapons" (Wunderwaffe) in no particular order.
Focke-Achgelis Fa 223 Drache wonder weapons worldwartwo.filminspector.com
Focke-Achgelis Fa 223 Drache.
Both Germany and the United States developed helicopters during World War II. The Luftwaffe, however, was far ahead of the United States and actually had flying helicopters even before the war began. One of these was the Focke-Achgelis Fa 223 Drache, which had two counter-rotating rotors on booms. The helicopters were perfectly flyable and many were built, but the Luftwaffe never really figured out how to use them effectively aside from performing mundane errands such as moving heavy equipment including cannons.
Coloring pages of Arado AR-234 German superweapons holiday.filminspector.com
Arado AR-234 bomber.
Jet engines were the key to advanced aircraft during the 1940s. The Germans developed many planes with jet engines during World War II. One of these was the Arado AR-234 bomber. These flew and saw service during World War II. In their most famous mission, they helped to destroy the "Bridge at Remagen" that the Allies captured in March 1945. Appearing too late in the war to make any difference, the AR-234 was extremely effective and could have become much more famous if the war had lasted longer. The Arado bomber was the first purpose-built medium bomber in history and the Allies had nothing like it.
Coloring pages of German superweapons holiday.filminspector.com
ME 163 Komet rocket plane.
German aircraft designers were as good as any in the world. The German Luftwaffe had many advanced planes that saw combat. One of them was the Messerschmidt ME-163 Komet rocket plane. It was faster than any Allied plane and was credited with shooting down some bombers in the last year of World War II.
Coloring pages of German superweapons holiday.filminspector.com
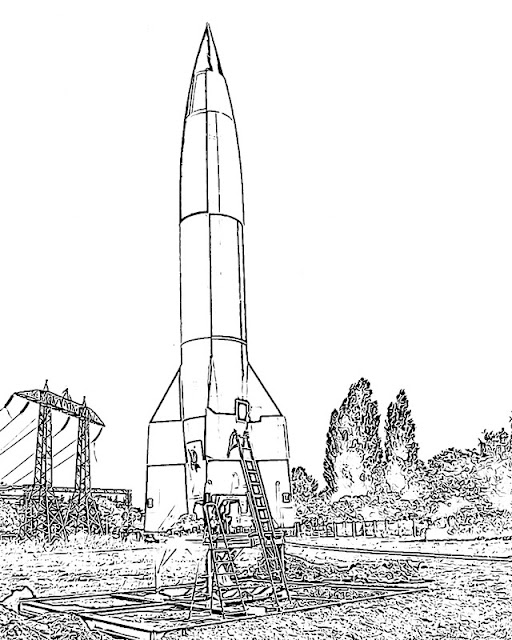
V-2 Rocket.
German rocket experts such as Wernher von Braun eventually helped to land the first men on the Moon. The Germans were very advanced with rocket designs and did not hesitate to use them for military purposes during World War II. They built and fired over 3,100 of their most advanced rockets, the V-2 vengeance weapon, against London and other targets. The V-2 was a deadly weapon that killed thousands of people. There was no defense against the V-2 other than defeating Germany.
Coloring pages of German superweapons holiday.filminspector.com
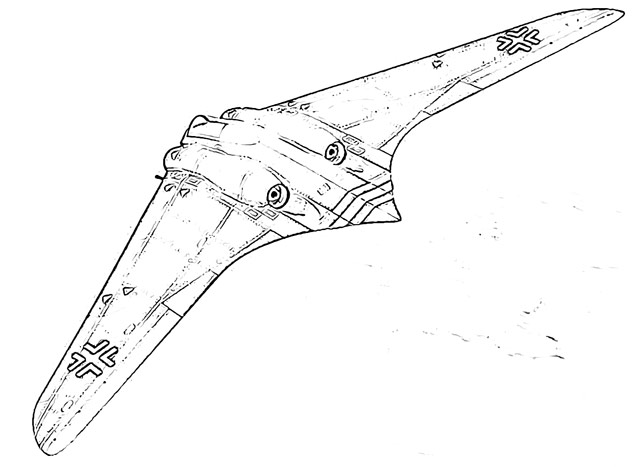
Horten Ho-229.
The Horten brothers were glider experts who decided to try their hand at designing an advanced Luftwaffe fighter. The Luftwaffe had advanced jet engines and also plane designs that the Allies had never seen before, so the two brothers used those and developed one of the most amazing jet planes of World War II. One of these was the Horten Ho-229, a jet-powered flying wing that flew several times in 1945. The Horten Ho-229 was a revolutionary concept that closely resembles the B-2 bomber that remains in service with the United States Air Force today. Like the B-2, it had stealth characteristics and other advanced features that were not matched for decades.
Coloring pages of German superweapons holiday.filminspector.com
U-2540 "Wilhelm Bauer."
U-boats were a menace to Allied shipping until the very end of World War II. The German Navy (Kriegsmarine) developed advanced submarines that saw action late in World War II. The Type XXI submarine was huge and operated off of batteries while underwater. It only had to surface to run its diesel engines to recharge its batteries, then could go underwater again for lengthy periods of time.

These submarines foreshadowed modern electric automobiles that also run off of batteries and only need to be recharged when the batteries run down. The most amazing thing about the Type XXI submarines was that, unlike all other submarines of World War II, they actually sailed faster underwater than on the surface due to their electric motors. U-2540, shown in the image, was one of the last Type XXI submarines built and was used by the post-war German Navy for decades after being refloated in the late 1950s. It literally was decades ahead of its time and remains on display at the Maritime Museum in Bremerhaven, Germany.
Coloring pages of German superweapons holiday.filminspector.com
Schwerer Gustav artillery piece.
Let's talk about really, really big guns. The image above shows German leader Adolf Hitler inspecting a massive artillery piece known as the Schwerer Gustav cannon. The German Army developed many huge cannons that were useful for destroying enemy bunkers. It moved on rail tracks and fired 7-ton shells from its 31.5-inch (80 cm) barrel to a distance of 29 miles (47 km). the Schwerer Gustav helped to win the battle of Sevastopol for the Germans and also was used against Leningrad.
Coloring pages of German superweapons holiday.filminspector.com
ME-262.
One of the most famous planes in history is the ME-262 Swallow. The Luftwaffe was the first air force to get a jet fighter into combat. this was the Messerschmidt ME-262, which had two jet engines and could outfly any other plane of World War II. The ME-262 entered service in 1944 and was a deadly threat to Allied bombers. Being faster than any Allied plane, the ME-262 could approach bombers from any direction and evade escorting fighters. While the Allies also developed jet engines and produced flyable jet aircraft that served in a defensive role, they were unable to get any jet aircraft into combat before World War II ended.
Coloring pages of German superweapons holiday.filminspector.com
Panzer VIII Maus tank.
If you want to talk about big tanks, the German Army had the biggest. The Germans built very big tanks as World War II continued, including the Tiger tank and the King Tiger tank. The biggest tank that they completed was the superheavy Panzer VIII Maus tank. This behemoth designed by Ferdinand Porsche weighed 188 tons, over three times that of any tank then (or now). It mounted a 128 mm (5 in) main gun that was able to destroy any other tank of its time. The Maus came along too late to see service during World War II, but two were completed and one may have fired a few shells at the enemy before being destroyed to avoid capture.
Coloring pages of German superweapons holiday.filminspector.com
V-1 flying bomb.
Some wonder weapons were very effective. While overshadowed by its flashier companion the V-2 rocket, the V-1 flying bomb was actually deadlier. They killed over 6,000 people in Great Britain, primarily within London, about three times as many as the V-2. The V-1 was slower than the V-2 and fast Allied fighters could match their speed and "tip" them off course, but they also were much cheaper and quicker to build and thus, in a strategic sense, more useful. In fact, the Allies were so fearful of the V-1 that they tailored their military strategy after the D-Day landings around occupying their launching sites. The V-1 is the direct ancestor of modern cruise missiles that remain in use today.

2021